Captured on an iPhone 4 using ClassicPAN; post processed with Painteresque, Blender, Iris on an iPad 2.

Wednesday, April 18, 2012

Great gory detail editing flowers... maybe more than you want!

This tutorial will tell you how to get from the original image (top image in the Diptic collage below) to the final image shown in the bottom half of the collage. Applications used include the native iPhone camera app (iPhone 4), Moku Hanga, Big Lens, Retouch, Impression and Snapseed. If you are experienced with some or all of these apps, you probably don't need the detailed explanation of some of the steps involved in producing the final image. If you are new to iPhone photo processing, you may want to follow my blog because I will be continuing to add tutorials as I find the time and will give detailed information wherever possible.

Moku Hanga effect applied

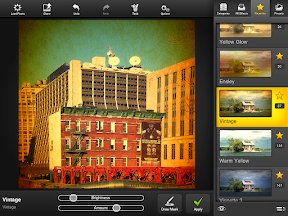
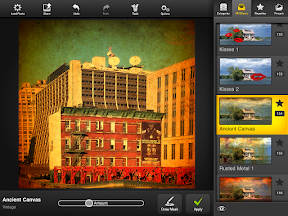
STEP 1 - Moku Hanga was used to apply the "Strong Color" effect at default settings as shown in the first image below. This was saved (second image below) and further processed (Steps 2-X) in

Moku Hanga effect applied

image saved from Moku Hanga

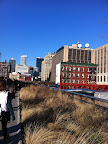
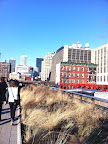
The image above was next taken into Big Lens and the flowers were selected to protect from blurring. Big Lens allows one to create a blurred bokeh effect by selecting the parts of the image one does NOT want blurred.

STEP 2: Use Big Lens to blur the background (the next six images show steps involved in GREAT detail with the image 2-a below showing a screen shot of Big Lens as it opens.
opening screen Big Lens
2-b: Rough selection of flowers; solid red shows selected area.
red shows selected area

2-c: Touch the image with your thumb and one finger; sweep outward to blow up the image to a larger size to allow refinement of the selection. Touching the brush icon brings up a slider that allows you to size the brush as desired.
screen shot of blown up image
2-d: Don't worry too much if you color 'outside the lines.' Just select the eraser and clean up the outline.
erasing mistakes

2-e: Image after cleaning up the edge.
cleaned up edge
2-f: Once you are satisfied with the result of selecting the flowers (or whatever), click the right facing arrow in the upper right corner in image 2-e to get to this screen.
TAG
Note that you will no longer see red marking the selection but you will see the effect of blurring the background on the unmasked part of the image. Click the Aperture button at the lower left in image 2-f and use the slider or the Aperture icons to blur the background to the desired degree and save the image (shown below).

TAG
The next several steps taken with this image were performed using Snapseed.


STEP 3: Snapseed Selective Adjust is first used to tone down the brightness of the background. Image 3-a below shows the opening screen of Snapseed after loading the image.
image in Snapseed
3-b: Touch the "Selective Adjust" module on the upper right of the panel next to the image in 3-a; then select the circled + to Add a control point. (this screen shot shows the "Add" already selected)
before adding a control point

3-c: Click this image if you are having trouble seeing the letter B in the blue circle in the lower left quadrant where I added it in the greenery, the area that I want to tone down. When you first add a control point, you will see a circle somewhere outside the letter B that is the area Snapseed will perform whatever selective adjustment you wish to perform on it. Sliding your finger up (or down) while holding the letter B will reveal that you may also choose to affect Saturation or Contrast instead of Brightness.
control point added

3-d: Manual dexterity was required to get this screen shot! To expand the area that will be affected by an added control point, put your finger and thumb on either side of the control point and use an outward sweeping motion to expand the circle. I managed to capture a screen shot showing the larger circle marked by a thin blue line. This is the area that will be impacted by any adjustments to BRIGHTNESS (as shown by the text below the image). If you haven't captured ALL of the area you wish to affect, you can add another control point. I added a second one in the upper right in the one area that wasn't grabbed by the first control point.
Snapseed selective adjust screen shot

3-e: I was still not happy with the background after dialing back the brightness (-~60%) as previously described and shown below.
reduced brightness in Snapseed
3-f: So after reducing the brightness, I then applied a Grunge filter at about 10% strength which left most of the middle of the image clear, clean and sharp but really toned down the distracting background.
grunge filter in Snapseed

3-g: Next I cropped (no image shown) and applied the Drama Bright 1 filter at about 40%.
Drama filter in Snapseed
3h: Next, used Retouch (not part of Snapseed, a separate app) to get rid of distracting bright spots below the flowers; note especially the small white spot below the middle flower.
image before last Retouch

STEP 4: The retouched image was then signed with Impression, giving me the finished product. It took me a LOT longer to write up this blog post than it did to do the editing described here.
TAG

Friday, April 13, 2012

Sunset, or not, from Point Reyes National Seashore...

I just got back from a marvelous workshop given by Teri Lou Dantzler and Harry Sandler in and around Napa, California. The workshop had both classroom and shooting teaching sessions. I learned so much... if I managed to retain one-fourth to half of what I think I learned, it will be marvelous! (you can find their schedule of workshops at The Last-Pixel Show as well as links to each of their blogs)

In the meantime, the original image for this "lesson" was taken with my iPhone using the SlowShutter camera app set for an 8-second exposure. The sky was pretty gray and the whole scene rather monotone so I put my sunglasses in front of the iPhone lens to add some color. The first image below is the original with no post-processing.

seascape in California
This image was brought into the Iris app on my iPad, cropped and then filters added as outlined below.

cropped and grunge added
The cropped image (to remove blown out sun in the top of the image) with the Grunge Frame 2 of Dust 'n' Scratches applied is shown above.
retro filter applied
The image immediately above shows the result of application of the Retro filter to the image above it.

Final post processed sunset image
It wasn't really sunset, but the magic of iPhone photography plus the hint Harry and Teri Lou gave me about using sunglasses in front of the lens makes this final image, signed using the Impression app, appear to be a gorgeous sunset. NOTE: The first and last images may be clicked to show full size images.

Sunday, April 1, 2012

First post for iPhone Photography (iPhoneography) Blog...

As some of my other blog followers have noticed, I've become increasingly hooked on iPhone photography over the last few months. Rather than continue to intersperse iPhone posts along with dSLR posts (as seen on my photography blog) and travel posts (as seen on my vacation blog), I've decided to start another blog for just my iPhone images. I will be including how-to instructions with some of my posts as well as simply sharing images. Since I'm extremely busy these days, I won't promise to post regularly but do hope eventually to post at least once a week.

Having recently completed a four week course in iPhoneography with Teri Lou Dantzler, I am newly inspired to share some of my images from that class along with the path I took to arrive at the end result.

dark 1st image from Pro HDR
dark 2nd image from Pro HDR
dark 3rd image from Pro HDR
light 1st image from Pro HDR
light 2nd image from Pro HDR
light 3rd image from Pro HDR
The six images above were taken with the Pro HDR app mounted on a tripod and set for a 2 second delay to avoid camera shake. The six images were loaded into AutoStitch to stitch a panorama. However, I was only interested in part of the resultant panorama so the image was taken into Filterstorm (I think), cropped and straightened to achieve the image shown below.

billboard seen from High Line in NYC

From there, the image was taken into PerfectPhoto to sharpen it and then into PhotoStudioHD to apply the Vintage effect (saved at this step as image1); then the Ancient Canvas effect was applied and the image saved again (image2). Steps shown below...

Vintage effect in PhotoStudioHD
Ancient Canvas effect in PhotoStudioHD
Blender was used to blend image1 and image2 at 60% strength for image2; resultant image is image3 shown below.

image3 from blend as described


Steamy Window effect in PhotoStudioHD
Vignette effect in PhotoStudioHD
Then image3 was loaded back into PhotoStudioHD to apply Steamy Window 2 and Vignette 3 effects in that order. The image was saved at this point, then signed with Impression for version 1 shown below.

signed image as described above
I wasn't 100% happy with the end result at this point, so I loaded the unsigned image into Iris and framed it with Iris, Dust ‘n’ Scratches Grunge Frame 2 which was applied with mask to remove speckles in the image itself and then signed this version in Impression with the result shown below.


framed and signed image as described above
Title: Better Energy as seen through a steamy window in Manhattan