Captured on an iPhone 4 using ClassicPAN; post processed with Painteresque, Blender, Iris on an iPad 2.
Showing posts with label processing. Show all posts

Friday, February 8, 2013

Rice drying in Cuba - iPad image processing

If anyone can tell me how to maintain the discipline I need to have in order to post regular tutorials here, I'd be eternally grateful! I am so easily distracted! This tutorial will outline how to go from what probably looks like a throw-away image to something that is quite nice and serves as a wonderful memory of my recent trip to Cuba with John Barclay, Tony Sweet and 11 other photographers. We learned that rice is dried on the road in Cuba. If one meets a vehicle coming down the one available lane of the two lane road being used for rice drying, one of the vehicles must drive over the rice in order to allow the other vehicle to pass. Fortunately, this is the "raw" rice before it has been hulled so I'm guessing/hoping the processing after the drying stage (which is done so the rice can be stored 'as is' until time to process it) takes care of getting rid of any dirt and debris added during the drying process!

The first image below is the result of processing the second image below through several steps which will be covered in detail in this tutorial. The original image was shot through the bus window with the iPhone 4s native camera app. Apps used for post processing on the iPad include PerfectPhoto, Touch Retouch, Painteresque, Image Blender, Photo fx Ultra, and A+ Signature.

finished image of rice drying in Cuba
Finished image of rice drying on the road in Cuba.

original, starting image
Original native iPhone 4s image shot through a bus window.

The first steps were done in PerfectPhoto (tutorial available) and included cropping, sharpening and denoise steps resulting in the image below.

cropped image
I chose a square crop to eliminate as many of the distracting elements as possible. You will have noticed that the crop I chose didn't eliminate all of the visor at the front of the bus (still visible along the top of the cropped image) and left some other artifacts and distracting elements due to having been shot through the bus window. I next used Touch Retouch to remove those elements I found distracting. Between the brush and the lasso tool, the entire process took me less than five minutes. If you are new to using this marvelous iPhone app, I recommend viewing the in-app tutorials as many times as necessary to get the hang it it. For those familiar with Photoshop content aware tools, Retouch is the iPhone answer to that function and does a fantastic job of retouching images!

When using Touch Retouch, two finger pinch or spread action will allow you to zoom out or zoom in to facilitate retouching. Sometimes, the entire image won't be visible at first in which case you will want to pinch the image to shrink it to fit in the screen so you can see the edges and work on them. A screen shot below shows the visor marked in red (it was selected using the lasso tool to select a bit of the blue sky all around the edge of the visor). When the right "arrow" (showing as a triangle to the right of the hand icon along the bottom edge of the screen shot below) is clicked after selecting an area for retouching, the retouch tool will magically get rid of the visor and replace it with blue sky.

retouch example
First step in retouching

Additional artifacts were removed with either the brush or the lasso, resulting in the retouched image shown below.

retouched image

Painteresque is just what it sounds like, a painting app that will apply a style of painterly treatment to an image. I had a specific "look" in mind for my finished image and knew that Painteresque would be a good choice. The screen shot below shows the image after Style Painteresque 2 was applied. As you can see, by selecting Style in Painteresque, you get a menu of style options. Experiment to see what is available. It is even possible to Fine Tune any of the styles but I accepted the default settings for the style. It is a bit "over the top" for the effect I wanted, but I knew that blending it with the retouched image in Image Blender would tone done the effect. So I saved it to the camera roll for continued processing.

screen shot of Painteresque treatment applied

The next screen shot shows the result of loading the retouched image into Blender (tutorial available) on the left side and the Painteresque processed image on the right side and blending using Normal blend with 60% of the Painteresque image in the blend.

painteresque style applied

The last step before signing with A+ Signature (tutorial available) was to take the blended image into Photo fx Ultra and apply a vignette using Lens/Vignette/Black Square at 50% amount and 100% softness as shown in the screen shot below. (The default amount is 100% amount which I find to be overpowering.)

photo fx ultra vignette applied

One step not illustrated is the second iteration of using Touch Retouch to get rid of a strange looking spot in the sky that was exaggerated once the Painteresque style had been applied. The finished image is shown again below because I'm too lazy to code the link needed to go back to the top of the page.

finished image of rice drying in Cuba
Finished image of rice drying on the road in Cuba.

Wednesday, May 16, 2012

Blue-eyed Grass, Olloclip Macro and post-processing fun

This blog is an ongoing effort in sharing some of what I've learned on my own and some of what I've learned through studying with Teri Lou Dantzler and Harry Sandler as well as following photographers too numerous to mention and studying their images and process.

Experienced iPhone photographers may find the detail unnecessary. Those new to iPhone photography should find these "lessons" helpful. I'm trying to post at least once a week except when traveling and doubt I'll ever post more often than once a week unless I become a more efficient at writing posts!

Today's lesson is an exercise in going from one image to the finished product shown below. Apps used include Bad Camera, Pic Grunger, A+ Signature and any app of your choice (I cannot recall which one I used) to crop a native iPhone camera image into a square format image. I do almost all my editing on an iPad 2 with occasional editing on my iPhone 4. Almost all iPhone apps may be used on the iPad as well by simply clicking 2x in the lower right when the app opens.

blue-eyed grass macro

Summary of steps for those who know the apps mentioned. Images to illustrate most of the steps will be included below the summary.

  1. Take a picture (Blue-eyed Grass flower is about 9-10 mm in diameter) of an item of your choice with the camera of your choice. I used the native iPhone 4 camera, an Olloclip macro lens and a tripod since it's impossible to hold the phone still while taking an image while focusing ~15mm away from the subject.
  2. Crop to square format if desired or use as is.
  3. Open image in Bad Camera, apply effect 18 and save the image.
  4. Now open the image from the above step in Bad Camera and apply the blue "Color" filter and save the image
  5. Open the saved image from step 4 in A+ Signature, sign and save.
  6. Open the saved image in Pic Grunger and select (from the Effects menu) the Cracked effect.
  7. Still in Pic Grunger, use the Strength option to move the slider to approximately 25% and save the image.
The starting point for creation of this image was the same as the image shown below minus the signature (uploaded a signed copy by mistake).

blue-eyed grass macro

Using Bad Camera to apply effects (steps 3 and 4)...

Bad Camera splash screenimage opened in Bad Camera
The Bad Camera app is an iPhone app; the first time you open it on an iPad, it will be 1x size; click the 2x in the lower right corner to have the app fill the screen on your iPad. To open an image, click the camera icon in the lower left of the splash screen (left image above) and select Open from Camera Roll. Note also that square format images will appear "squished" when brought into Bad Camera as seen on the right. This is nothing to worry about as you will see after applying an effect and saving the image.

Effects screen for Bad Cameraimage shown in bad camera with effect
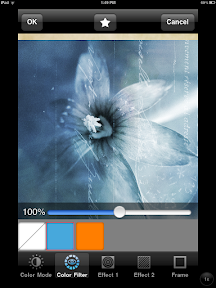
Click the √234 square icon to bring up the Effects screen shown here and scroll down to select Effect 18 for the image; the Effect will be shown at which point, click the envelope icon and select save to camera roll to get the image shown below.

Effect 18 Bad Camera image
This image will be loaded back into Bad Camera to apply the next effect.

blue color effect appliedsaved image with blue color effect
After loading the previously saved image with Effect 18 applied into Bad Camera, click the slider icon (three straight lines on the main screen for Bad Camera) to get to the next screen where you may choose additional treatments; click Color, choose blue as the filter and save the image (result shown on the right).

Using A+ Signature to sign (step 5)...

TAGTAG
The left image shows the screen after bringing an image into A+ Signature; use the gear (next to Help on the lower left) to get to the Preferences screen. The first time you use A+ Signature, the default settings for Preferences have a GIANT SIGNATURE that is white text with a shadow in a text I personally would never use. If you set things up for your signature in a font, style, and color that you like, then you will have that setup as your starting point for all future signatures. I had already set a signature in gray with Zapfino text and no shadow.


click select text to allow delete/rotate
The text is difficult to see in the center of the image on the left. (when you click "Text" in the red bar below the image, the default signature text gets added in the middle of the image) Select this text to reveal an "X" in the upper left corner of the text bounding box and a tiny circle symbol surrounded by three directional arrows in the right, middle of the bounding box. The X allows one to delete text boxes entirely; grabbing on the circle surrounded by three arrows and dragging in a direction (up or down) will rotate the text.

change text color to whiteposition and size signature
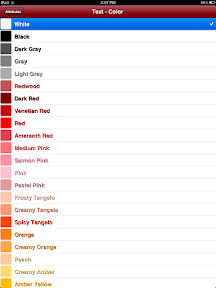
Double-click the text box to allow editing; change the text color to white as shown in the color Attributes page and in the image on the right; right image shows text location and size after using two fingers to shrink or expand text size as required.

flower image signed
Image signed in A+ Signature BEFORE applying grunge effect so that all the text (both signature and that from Bad Camera effect) is affected the same by grunge effect.

Using Pic Grunger to apply effects (steps 6 and 7)...

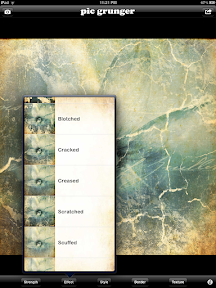
Pic Grunger cracked effectreducing strength of grunge effect
The left image shows application of the Cracked effect in Pic Grunger; the right image shows reduction of the effect strength to about 25%. Documenting the editing that resulted in the finished product took FAR longer than it did to produce the final image.

Friday, April 13, 2012

Sunset, or not, from Point Reyes National Seashore...

I just got back from a marvelous workshop given by Teri Lou Dantzler and Harry Sandler in and around Napa, California. The workshop had both classroom and shooting teaching sessions. I learned so much... if I managed to retain one-fourth to half of what I think I learned, it will be marvelous! (you can find their schedule of workshops at The Last-Pixel Show as well as links to each of their blogs)

In the meantime, the original image for this "lesson" was taken with my iPhone using the SlowShutter camera app set for an 8-second exposure. The sky was pretty gray and the whole scene rather monotone so I put my sunglasses in front of the iPhone lens to add some color. The first image below is the original with no post-processing.

seascape in California
This image was brought into the Iris app on my iPad, cropped and then filters added as outlined below.

cropped and grunge added
The cropped image (to remove blown out sun in the top of the image) with the Grunge Frame 2 of Dust 'n' Scratches applied is shown above.
retro filter applied
The image immediately above shows the result of application of the Retro filter to the image above it.

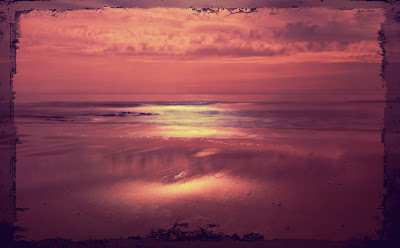
Final post processed sunset image
It wasn't really sunset, but the magic of iPhone photography plus the hint Harry and Teri Lou gave me about using sunglasses in front of the lens makes this final image, signed using the Impression app, appear to be a gorgeous sunset. NOTE: The first and last images may be clicked to show full size images.