
Experienced iPhone photographers may find the detail unnecessary. Those new to iPhone photography should find these "lessons" helpful. I'm trying to post at least once a week except when traveling and doubt I'll ever post more often than once a week unless I become a more efficient at writing posts!
Today's lesson is an exercise in going from one image to the finished product shown below. Apps used include Bad Camera, Pic Grunger, A+ Signature and any app of your choice (I cannot recall which one I used) to crop a native iPhone camera image into a square format image. I do almost all my editing on an iPad 2 with occasional editing on my iPhone 4. Almost all iPhone apps may be used on the iPad as well by simply clicking 2x in the lower right when the app opens.

Summary of steps for those who know the apps mentioned. Images to illustrate most of the steps will be included below the summary.
- Take a picture (Blue-eyed Grass flower is about 9-10 mm in diameter) of an item of your choice with the camera of your choice. I used the native iPhone 4 camera, an Olloclip macro lens and a tripod since it's impossible to hold the phone still while taking an image while focusing ~15mm away from the subject.
- Crop to square format if desired or use as is.
- Open image in Bad Camera, apply effect 18 and save the image.
- Now open the image from the above step in Bad Camera and apply the blue "Color" filter and save the image
- Open the saved image from step 4 in A+ Signature, sign and save.
- Open the saved image in Pic Grunger and select (from the Effects menu) the Cracked effect.
- Still in Pic Grunger, use the Strength option to move the slider to approximately 25% and save the image.

Using Bad Camera to apply effects (steps 3 and 4)...
  |
The Bad Camera app is an iPhone app; the first time you open it on an iPad, it will be 1x size; click the 2x in the lower right corner to have the app fill the screen on your iPad. To open an image, click the camera icon in the lower left of the splash screen (left image above) and select Open from Camera Roll. Note also that square format images will appear "squished" when brought into Bad Camera as seen on the right. This is nothing to worry about as you will see after applying an effect and saving the image.
  |
Click the √234 square icon to bring up the Effects screen shown here and scroll down to select Effect 18 for the image; the Effect will be shown at which point, click the envelope icon and select save to camera roll to get the image shown below.

This image will be loaded back into Bad Camera to apply the next effect.
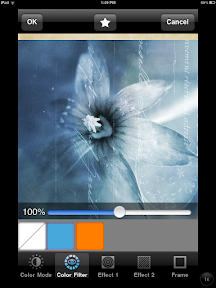  |
After loading the previously saved image with Effect 18 applied into Bad Camera, click the slider icon (three straight lines on the main screen for Bad Camera) to get to the next screen where you may choose additional treatments; click Color, choose blue as the filter and save the image (result shown on the right).
Using A+ Signature to sign (step 5)...
  |
The left image shows the screen after bringing an image into A+ Signature; use the gear (next to Help on the lower left) to get to the Preferences screen. The first time you use A+ Signature, the default settings for Preferences have a GIANT SIGNATURE that is white text with a shadow in a text I personally would never use. If you set things up for your signature in a font, style, and color that you like, then you will have that setup as your starting point for all future signatures. I had already set a signature in gray with Zapfino text and no shadow.
  |
The text is difficult to see in the center of the image on the left. (when you click "Text" in the red bar below the image, the default signature text gets added in the middle of the image) Select this text to reveal an "X" in the upper left corner of the text bounding box and a tiny circle symbol surrounded by three directional arrows in the right, middle of the bounding box. The X allows one to delete text boxes entirely; grabbing on the circle surrounded by three arrows and dragging in a direction (up or down) will rotate the text.
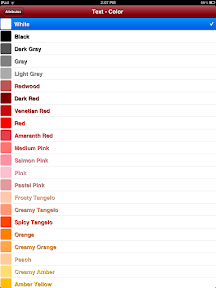  |
Double-click the text box to allow editing; change the text color to white as shown in the color Attributes page and in the image on the right; right image shows text location and size after using two fingers to shrink or expand text size as required.

Image signed in A+ Signature BEFORE applying grunge effect so that all the text (both signature and that from Bad Camera effect) is affected the same by grunge effect.
Using Pic Grunger to apply effects (steps 6 and 7)...
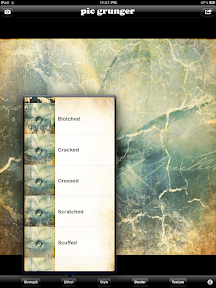  |
The left image shows application of the Cracked effect in Pic Grunger; the right image shows reduction of the effect strength to about 25%. Documenting the editing that resulted in the finished product took FAR longer than it did to produce the final image.
You go girl! What a great image and what a great lesson. You are doing a fabulous job.
ReplyDeleteYou are way out in the stratosphere with all this iPhone technology, Victoria. I am duly impressed!
ReplyDeleteLove this image Victoria, and thx for documenting what you did to produce it.
ReplyDelete