Captured on an iPhone 4 using ClassicPAN; post processed with Painteresque, Blender, Iris on an iPad 2.

Sunday, December 9, 2012

Fall scenery in the Smoky Mountains... iPhone style!

This is an iPhone image from my recent trip to the Smoky Mountains on a marvelous photo tour with John Barclay and Dan Sniffin. As always, you may view it larger by clicking the image. (Follow the links for more information on apps that I've either reviewed or covered in more detail elsewhere)

Smoky Mountain Tennessee; iPhone fall scene
Post processing of the native iPhone 4s camera images included merging in True HDR, then using PerfectPhoto to crop and sharpen a the image a bit. Photo fx Ultra processing (taking advantage of the Add Layer feature to stack filters) was used to add Photographic/Light Balancing, Diffusion/Warm Center Spot (no blur) and Lens/Vignette/Black Square with default settings reduced to give just a bit of vignette around the edges. A+ Signature was used to sign the image. NOTE that A+ Signature has recently had a significant upgrade so my tutorial might need to be updated also.

For completely different look to this same scene, visit my other photography blog post.


Sunday, October 14, 2012

Historic Canal Boat at Great Falls Park, MD

With all the furor over the iPhone 5 recently, I made an executive decision to purchase an iPhone 4s (64GB) because I have too many accessories that will not work with the iPhone 5 and I'm not willing to spend money to upgrade all of those accessories AND my phone at this time.

Since what I had previously was an iPhone 4, I did get an upgrade to the camera from a camera capable of capturing only 5 megapixel images to one capable of capturing 8 megapixel images. This will allow me to print my iPhone art/images at a larger size if I choose to do so. Today I'm sharing the processing that resulted in the image below... all the steps. The original image was captured with the iPhone 4s native camera in HDR mode. (as always, you may click any of the images to view them larger size)

canal boat, final image
Apps used included True HDR, PerfectPhoto (sharpen and denoise), touchRetouch, Photo fx Ultra (several effects), AutoPainter HD Van Gogh, Image Blender, A+ Signature (Allura text). This image is for sale on Fine Art America, as are others of my images. And I'm posting to Weekly Top Shot today... wish I could post there every week! Check it out for other nice images.

Since I've previously discussed True HDR and covered PerfectPhoto, Image Blender, and A+ Signature usage in a separate post for each app, I will concentrate on the effects that I applied using Photo fx Ultra which I have been using a LOT lately. Please note that this is NOT a comprehensive tutorial on using Photo fx Ultra. The app has a LOT of filters, effects and I'm only just beginning to appreciate the power of this app. There is a YouTube video that shows the basic features of the app and Tiffin has a bit of information about it on their web site.

canal boat, starting image
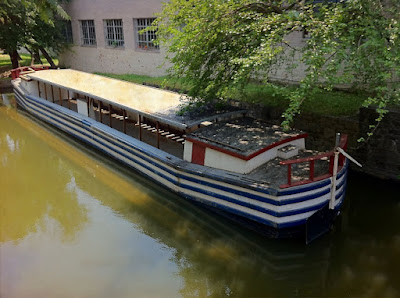
True HDR merged image, the starting point for post-processing.

retouched image
touchRetouch was used to remove the light post and its reflection because I found it distracting. A combination of the 'eraser' brush and cloning tool was used. Retouch (app icon name after installation) is fairly straightforward to use and has built-in help and tutorials. (look for the basic tutorial, advanced tutorial and help topics under the i in the upper right hand corner after opening an image) The one setting I would encourage you to turn on is Always Use Max Resolution.

polarizer effect screen shot
This screen shot shows the first effect that was applied in Photo fx Ultra to the retouched image. The Polarizer/Polarizer 5 effect in the Special Effects set was applied using the Default settings for the effect. Note that the categories of effects are across the bottom; the options shown on the left change depending on which of the bottom categories and which subset of each category you choose. ANY of the effects can be modified to suit you (using the various sliders that appear when you choose an effect) and those modifications may be saved as a personal effect. To continue modifying an image after an effect has been applied, select Add Layer from the options that appear when you click on the upper right corner arrow to save (or otherwise handle) your image.

soft light effect screen shot
The screen shot for the second effect shows Soft Light/Soft Light 5 in the Light category being applied on top of the previous layer. I cannot recall if I changed the settings from the default settings for this effect. I continued by choosing Add Layer and choosing a third category of effects to apply.

black vignette screen shot
Because I wanted to focus attention on the boat, I chose to apply a vignette next, using the Lens/Vignette/Black Circle effect. I adjusted the sliders for this effect to soften it a bit from how it appeared with the default settings.

diffusion warm center spot screen shot
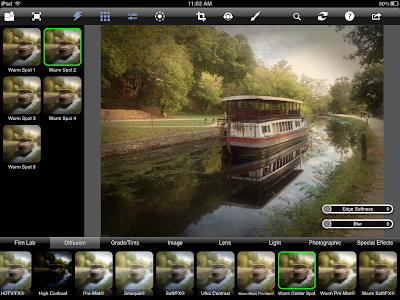
Again, to continue the processing with the intent of drawing the viewer in to the center of the image to focus on the boat, I applied the Diffusion/Warm Center Spot/Warm Spot 2 effect and adjusted the default settings so that the overall image remained sharp but was warmer in the middle. (I did not want to blur the edges.) This Photo fx Ultra image was saved and was the image used for later blending as will be described.

collage of images as described
At this point, I'm including a collage of the main steps used in processing from start to finish of this image. (click any link to see larger views of each image; to return here, use Back in your browser) The upper left image is the True HDR merged image after retouching; the upper right image is after the previously described four effects had been applied in Photo fx Ultra; the lower left image is the Auto Painter Van Gogh effect applied to the True HDR image; and the bottom right is the blended, final image. (more detail on the steps to achieve the final image is given below)

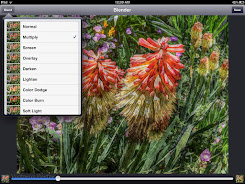
The final image was blended several times to achieve the result I was going for and to restore the image size which had suffered some downsizing throughout the processing steps. The first blending step involved blending the Van Gogh effect image with the image after application of the Photo fx Ultra effects. I used a normal blend and blended in only 20% of the Van Gogh image so as not to overpower the effects I'd achieved with Photo fx Ultra. I wasn't 100% satisfied so I blended the result with the original True HDR image using masking with opacity to bring back some of the detail on just the boat. This image was signed using A+ Signature, Allura text.

And last, since I noticed some loss of pixels in the signed, final image, I loaded the dark exposure of the two HDR images as the background image in Blender, reduced the background opacity so that it did not affect the blend and blended that original image with the signed final image which effectively returned the image size to the same as the original and would allow me to print it as large as 12x16 inches without appreciable loss of detail.

Friday, September 21, 2012

Processing an SLR image on an iPad with iOS apps

I had an SLR image that I wanted to edit and could not figure out how to do it on my computer. So I moved a JPG of the image to my iPad after "assembling" the HDR image from 3 SLR shots. And then I proceeded to work on it with various iPad apps... the first of which was retouch to remove the overhead wires. The scene is from just outside the hotel in Dingle, Ireland where we stayed the first 3 nights of a Photography Tour led by John Barclay, Peter Cox and Dan Sniffin.

HDR image from computer...

farm field under cloudy skies

Retouched (Touch/Retouch app) to remove overhead wires.

retouched image

Glaze app effect applied... Glaze is one of those apps where you just have to experiment to see which of the effects you like.

glazed image

Screen shot of Blender app settings when blending Glaze treated image with Retouched image.

screen shot of Blender settings

Image saved after blending as shown above.

blended image

Screen shot of DynaLight HD treatment applied to the previous image.

screen shot from DynaLight HD

Image saved after DynaLight HD effect had been applied as shown above.

saved image with DynaLight HD effect

PhotoToaster used to frame image with settings shown in the screen shot below.

screen shot from PhotoToaster showing frame

Final image after framing and signing in A+ Signature.

framed and signed image

So there you have it... the best of both worlds in my opinion. An SLR image with high resolution and lots of detail treated with iOS apps to turn it into something other than a literal interpretation of the scene. Perhaps you prefer the unedited image but I sure am having fun being creative with my photos.

Monday, July 30, 2012

Seattle Sunset post processing revealed

Apps used in this tutorial include some that have been already discussed in more detail on separate pages devoted to each of the apps. They will appear as links in the tutorial below.

A panorama image from 9 images shot with Bracket Mode (an HDR camera) where only the darker of each image pair was selected to merge in AutoStitch was used as the starting point. AutoPainter was used to apply the Benson effect to the panorama and the paint version was then blended (using Blender; tutorial) at 50% with the untreated panoramic image to give the image shown below which is where this tutorial starts.

panorama image starting point

Steps in brief (not all images are shown) follow:
  1. Apply the Lindale effect at reduced strength in PhotoStudioHD (tutorial).
  2. Apply the Vintage effect in PhotoStudioHD and save the image.
  3. Load the image into Wood Camera and apply Frame 5 to it and Save it. (Frame 5 adds bird silhouettes to an image; an excellent tutorial for Wood Camera is available elsewhere.
  4. Load the saved image into A+ Signature (tutorial), sign and save.

seattle sunset with Lindale and Vintage effects
Image with PhotoStudioHD Lindale and Vintage effects applied; PhotoStudio HD tutorial.

TAG
Image after applying Frame 5 in Wood Camera (tutorial elsewhere) and signing in A+ Signature (tutorial).

Monday, June 11, 2012

Hydrangea post processing with Painteresque, Moku Hanga and Blender...

This tutorial demonstrates use of Moku Hanga and Painteresque to create a couple of layers (images) that are then blended using Blender to achieve a final result that I found pleasing. It is a very simple tutorial. As always, the steps will be summarized first and then a series of images showing the process will be included below the outline.

  1. The starting point for this tutorial is a cropped and sharpened image (see the PerfectPhoto app guide for steps) obtained from merging HDR images (TrueHDR) shot with the iPhone 4 native camera.
  2. The image was loaded into Painteresque for one "layer" to be used later (Image 1).
  3. The Portrait preset in Moku Hanga was applied to the cropped, sharpened image and the image saved (Image 2).
  4. Image 1 and Image 2 were brought into Blender and blended with Luminosity at 50% and the image was saved.
  5. The saved, blended image was signed with A+ Signature.
  6. Two other images were created for possible future blends, one from AutoPainter Benson effect and one from using "My flower preset" in Moku Hanga. (My flower preset is based on Landscape 2 with the border removed and makes a very nice flower painting.)

cropped and sharpened image
This tutorial starts where the app guide for PerfectPhoto left off, with the cropped and sharpened Hydrangea image.

Painteresque effect
Painteresque effect applied to the cropped, sharpened image.

Moku Hanga screen shot
Several preset effects are available in Moku Hanga. It is worth your time to play around with the presets and discover what works best for your image and the effect you are trying to achieve. For example, the preset I chose for my Hydrangea image is labeled "Portrait" and I just happened to like the effect achieved here. At some point, I might write a mini-tutorial on Moku Hanga but it is pretty straightforward to use. Any image loaded into it will have an effect applied automatically but I never know WHICH effect is applied. Since I like to know what effect is being applied, I always experiment a bit. If you find an effect you like, you can save it out as a Preset with a name that makes sense to you. Use the Share button and select Save Preset instead of Save; presets are organized alphabetically in Moku Hanga so yours will appear according to that organization the next time you open Moku Hanga.

Portrait effect image from Moku Hanga
Saved image after application of the Portrait effect in Moku Hanga.

screen shot of Blender process
Screen shot of Blender showing 50% Luminosity blend of the Moku Hanga Portrait image with the Painteresque image.

signed image
Signed image (signed with A+ Signature; usage covered elsewhere after blending as described above.)

These last three images are included to show a screen shot after using "My flower preset" in Moku Hanga, the saved image after applying that preset, and last, AutoPainter 3 Monet effect applied to the cropped, sharpened image. I often save multiple versions of an image for later experimentation, even after I've found one combination I like well enough to sign it.

my flower preset in Moku Hanga
The preset I've saved in Moku Hanga as "My flower preset" is based on the supplied Landscape 2 preset with the border removed.

Moku Hanga saved with my flower preset effect applied
Image saved from Moku Hanga after applying "My flower preset."

AutoPainter 3 Monet effect applied to image
AutoPainter 3 Monet effect.

Saturday, June 2, 2012

C&O Canal Boat, idle in Georgetown, DC

While wandering around Georgetown last Saturday before having lunch with a friend, I spotted this canal boat parked near 31st St NW. The light caught my eye even though I was quite certain the sunlight would "blow out" the white roof completely. I could see editing the image to take care of that and just maybe end up with something quite nice.

My iPhone tutorial posts will follow a general format of showing the starting and ending image at the start of the post, followed by the "expert" recipe. After the "expert" recipe, I'll show the step by step process. Please realize that these tutorials are really not intended to be a "go out and repeat this exactly" recipe but rather a tutorial to show one (sometimes two) possible processing paths for an image. Those of you unfamiliar with iPhone processing of images may not realize yet the HUGE number of apps available for post processing (both iPhone and iPad). My hope is that these tutorials will start you on a path of exploration to discover for yourselves the many possibilities there are for tuning your images into something that you envision when out exploring the world.

TrueHDR merged image
signed image after processing as described
signed image after further processing as described
The top image (obtained by merging two exposures (shot with the native iP4 camera in HDR mode) using TrueHDR) is the starting point; the middle image is the image obtained from processing as outlined below through Step 6; the bottom image is the result of applying an effect to the Image from Step 2 in the outline below and blending that with the image processed through Step 5. (Note that the above images may be viewed larger size by clicking on any one of them.)

  1. The two HDR exposures were merged with TrueHDR.
  2. PerfectPhoto was used to sharpen, and de-noise the image (Image A in future steps).
  3. The Ancient Canvas effect was applied using PhotoStudio HD and the image saved (Image B in future steps).
  4. Blender was used to blend images A and B at 70% Normal Blend.
  5. Pic Grunger was used to apply the "Scuffed" Effect at ~40% (Image C in future steps).
  6. Image C was signed using A+ Signature.
  7. One could stop at this point but I chose to try one other blend.
  8. A Moku Hanga effect (will figure out which one at some point, experiment) was applied using a Preset that I saved some time ago and cannot recall exactly how I got it (danger of late night playing); result saved (Image D).
  9. Images C and D were blended using the Luminosity Effect in Blender.
  10. The result of the blend above was signed using A+ Signature.

TrueHDR merged imagesharpened and de-noised image
I'm showing this because it amazed me to see the difference in the image after sharpening it and also using the Denoise option in PerfectPhoto; left image before sharpen and denoise were applied, right image after sharpen and denoise.


>
screen shot of Ancient Canvas effectAncient Canvas effect saved image
Screen Shot of application of Ancient Canvas applied to image; saved image after application of Ancient Canvas.

blended image as described
scuffed effect Pic Grunger image
The top image is the result of blending Image A and Image B using Normal Blend at 70%; masking was used to bring the Ancient Canvas effect onto the blown out white roof and leave the rest of the image relatively untouched; the bottom image is after application of the Scuffed effect (at 40%) to the blended image using Pic Grunger (Image C). (The signed Image C is not shown before continuing with additional post processing steps since it is the middle image in th set of three images at the top of the page.)

screen shot from Moku Hanga
image saved after application of Moku Hanga effect
The top image is a screen shot of the application of a saved preset in Moku Hanga; the second image is the saved image (Image D) after application of that effect.

screen shot of luminosity blend of images
image after applying luminosity blend
The top image is a screen shot of application of the Luminosity blend at 40% to Images C & D in Blender; the bottom image is the saved, blended image. (Again, the signed image is not included here because it is the third of the three images at the top of the page.)

Monday, May 21, 2012

How to blend two "blah" images into something nicer...

trueHDR image 1trueHDR image 2
While stopping by a friend's garden, I noticed these Red Hot Poker flowers and decided to see what I could do with creating an image using them. Notice that the left image (referred to as Image 1) has nothing interesting on the far right and that the right image (Image 2) has a very boring background. However, I could visualize possibilities for a very nice image by combining elements of the two images into a single image. This tutorial will explain the process that I used to reach the following two possible end results. (As always, experienced iPhone photographers will probably find the detailed steps tedious but those of you new to iPhone photography and post processing might just learn a thing or two. At least that is what I hope!) Linking to Weekly Top Shots.

Steps in brief for the experts among you...
  1. Images 1 and 2 were obtained by merging two images (shot with iPhone 4 native camera in HDR mode) in TrueHDR.
  2. PerfectPhoto was used on Image 1 to Sharpen, Denoise and save the image.
  3. PhotoForge was used to crop Image 2 and slightly rotate it so flower stems aligned with those in Image 1.
  4. BlurFX was used to slightly blur Image 2 since it will be in the background in the final images.
  5. Blender was used with masking and arranging to position Image 2 behind Image 1 and paint away the right side Image 1 to reveal parts of Image 2 that I wanted in the final blended image; blend at 100% to completely hide Image 1.
  6. Retouch was used to remove parts of the image I found distracting.
  7. Three painting apps were used on the blended image to achieve 3 different looks for further blending.
    • Moku Hanga (later referred to as Moku image)
    • Painteresque (later referred to as Painteresque image)
    • AutoPainter Benson (later referred to as AutoPainter image)
  8. The Painteresque image was blended at 20% Multiply (screen shot) with the Moku image.
  9. The Painteresque image was also blended at 50% Normal with the AutoPainter image
  10. Both end result images were signed with A+ Signature.

Moku Hanga blend with painteresque
painteresque autopainter benson blend
The top image is one option for final processing; the bottom image is a second (and preferred by me) option for the final image. Both processing paths will be explained in the following steps.

sharpen and denoise image 1 in PerfectPhoto
crop and slight rotation of image 2 in PhotoForge
Image 2 has the Red Hot Poker flowers growing upright whereas Image 1 (shown as the first image above after the Sharpen and Denoise steps in PerfectPhoto had been performed) has them tilted (that's how they were growing in the garden). Because I wanted to use image 2 in the background of image 1 when I blended the images, I used the PhotoForge (not PhotoForge2) Crop Tool to crop and slightly rotate Image 2 using the 1° incremental arrows until the flower stems were angled similarly to those in Image 1 as shown in the PhotoForge screen shot above.

cropped, rotated image 2blurred image 2
The cropped and rotated Image 2 (left image) was loaded into BlurFX and a slight bit of Gaussian Blur was applied to achieve the desired degree of 'out of focus' look for blending with Image 1. Hint about using BlurFX: Use the New button to load in an image; then select (if it isn't already selected) the Gaussian Blur effect and use the Threshold slider to tone down the blurriness (right image) until you are happy with the result.

final blended image
final blended image after retouch

Complete instructions for using Blender to blend and mask these two images to get the top image as the final result are on a separate page in the interest of keeping these instructions somewhat brief! The bottom image is after retouching (Retouch app) out some elements of the blended image that I found distracting.

Now for the fun part. Shown below are the results of using three different painting apps to achieve artistic effects that will be combined (again using Blender) to achieve two different looks for the blended image.
moku hanga treatment
The image above shows a Moku HD (Moku Hanga on the iPad) painting effect applied to the blended image. This app seems to randomize the Style that is applied when you load an image into it. If you find a look you like by experimenting with the Styles and controls, you can save it as a Preset using the Share button and it will show up in Styles the next time you open Moku HD. It is possible to tune each Style by using the Adjust (to adjust brush effects), Paper and Border settings on the Style. I've found I like the Landscape Style with the border removed for MOST of the images I process (including this one) and have saved that as a preset.
painteresque treatment
The image above shows Painteresque processing of the blended image. Painteresque is very simple. There are no options for changing the effect on your image and no settings options. You either like what it does or you don't. I find it very interesting but somewhat overdone so almost always blend a Painteresque version of an image with another version of the same image to tone it down.
autopainter benson treatment
The image above shows application of the AutoPainter Benson effect to the blended image. I have the original AutoPainter app which has four effects. I've experimented A LOT with it and almost always come back to the Benson effect and apply that to my images before blending with another version of the same image.

screen shot of Blender processimage result of blend
On the left is a screen shot of Blender showing conditions of blending Painteresque image (loaded on the left in Blender) with the Moku HD image (loaded on the right in Blender); on the right is the saved output from this blend which was signed in A+ Signature to yield the result shown in the top one of the two images shown elsewhere.


screen shot of autopainter benson blend with painteresqueimage result of blend
On the left is a screen shot of Blender showing conditions of blending the Painteresque image (loaded on the left in Blender) with the AutoPainter Benson image (loaded on the right in Blender); on the right is the saved output from this blend which was signed in A+ Signature to yield the result shown in the bottom one of the two images shown elsewhere.