
There is already an excellent tutorial on using FX Photo Studio on the iPhone so I will show a few effects as applied to my starting image and leave it to the reader to visit iPhoneography Central for the excellent tutorial on the iPhone version of this software. I also include references to saving Presets and screen shots for the various actions one might want to perform once an image has been loaded into PhotoStudioHD.
One thing that the iPad app does NOT do is rotate... it only works in Landscape mode. I have included small images that may be clicked to view the larger size of each image.
When you open PhotoStudioHD you will be presented with a screen that gives you an option of loading an image (a folder icon) as well as a few other options. This tutorial is for the purpose of demonstrating how to use effects on an image in a "Photo Album;" other options include importing an image from Facebook or Documents (neither of which I've ever done). Click the Photo Album option and select an image, click the Use button on the next screen and you will something similar to the following image.

I will discuss each of the options seen across the top of this image. Note that All Effects on the right is the selected option for Effects that may be applied. Some iPhone photographers will list the effects they apply "by the numbers" (in the box under the star to the right of each effect) so use this list view if you are looking for a numbered effect. If you find an effect you really like that you think you will use many times, click the star to add it to your Favorites list.
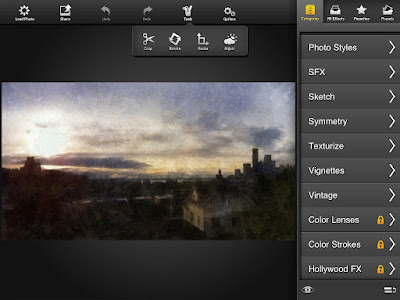
Click the tools button to reveal Crop, Rotate (no free rotation; 90° increments only), Resize and Adjust options. I prefer to use other apps to do any/all of the above. Click the Categories button on the right to reveal the categories of effects if you know what type of effect you want to apply to your image.
 |  |
On the left, you see my Favorites list; on the right, my Presets. I will discuss creating and saving presets later in this tutorial.
 |  |
Before I forget, on the left is the way I have my Options set up; you may choose to turn off the Amazing Facts (they display while an Effect is being applied) if you find them annoying. I find them amusing. On the right is what you will see when you are ready to save (Share) your image. If you want to Share to any of the social sights listed on this screen, you will get prompted to enter login credentials. I generally save to my Photo Album only.
 |
 |
The top screen shot shows the Lindale effect applied to my image; note that if you want to apply it with less 'power' as I did, use the slider for Amount to reduce the intensity of the effect. And if you want to apply an effect to only a portion of an image, use the Draw Mask option to paint the effect onto the portion of the image where you want it applied. Once you are happy with an effect, use the Apply button to lock it onto the image. You may then apply a second effect if desired. Since I knew I wanted a Vintage look for this image, I selected the Categories/Vintage option and found I liked the Vintage effect (87), dialed back from the default strength as shown in the bottom screen shot.
Some time ago, I had edited this image to this point and decided that I wanted to add a frame to it. But I didn't like any of the "Classic Frames" supplied with PhotoStudioHD. I scrolled down in the Categories to see if there were other frames available and found Art Frames with a padlock next to it. This signified an "in-app" purchase option was required in order to access those frames. So I went ahead and purchased them and chose the frame shown below to frame the image.

Because I liked the over-all effect achieved, I chose to save it as a Preset that would allow me to apply all three effects with a single click on the saved preset. What follows is the creation of a new preset and demonstration of the actions required to save (and optionally, share) it.

Starting again with the same image, I applied the Vintage/Burnt Paper (68) effect followed by the Glow/Yellow Glow (24) effect, reducing both the glow amount and brightness.
 |  |
To add the preset (shown already added above), click on the + and then the Save applied effects to preset button. (the Enter Preset Code option would be used if someone has supplied you with a code) Enter a name that is meaningful to you and click the Done button to save the preset; I named my preset burnt paper + yellow glow reduced. From now on, this preset will be available to me under the Presets button.
 |
 |
The top image of the two above shows the code required to share the preset and the name you have chosen for it. These options are shown when you click the side-ways V icon next to a preset name (shown in the top image at the lower left corner of the screen shot). Note that Presets cannot be shared from iPad <-> iPhone because settings are different on each even though similar presets exist on both. In addition, sometimes an update to the app will render a formerly saved Preset invalid. So use caution when sharing presets. The bottom image above is what you will see when you click the pencil icon; here you may delete presets that no longer work or chose to rename one.
Remember to Share your image(s) to the Photo Album if you intend to continue adding effects from other apps or post them as is. The two images below are from the two treatments illustrated above. (Note that the frame on the image with the Lindale and Vintage effects applied was not used in this example which will have additional editing using a different application as demonstrated in this tutorial.)
 |
 |
Top image: Lindale and Vintage effects applied; bottom image; Burnt Paper and Yellow Glow effects applied.
No comments:
Post a Comment
I appreciate your comments and hope to return your visits soon. If you have any questions about apps used in tutorials, drop a comment with your question and I will either respond here (if the answer is brief) or address it in a future post if I have an answer for you. :-)