Captured on an iPhone 4 using ClassicPAN; post processed with Painteresque, Blender, Iris on an iPad 2.
Showing posts with label Painteresque. Show all posts

Friday, February 8, 2013

Rice drying in Cuba - iPad image processing

If anyone can tell me how to maintain the discipline I need to have in order to post regular tutorials here, I'd be eternally grateful! I am so easily distracted! This tutorial will outline how to go from what probably looks like a throw-away image to something that is quite nice and serves as a wonderful memory of my recent trip to Cuba with John Barclay, Tony Sweet and 11 other photographers. We learned that rice is dried on the road in Cuba. If one meets a vehicle coming down the one available lane of the two lane road being used for rice drying, one of the vehicles must drive over the rice in order to allow the other vehicle to pass. Fortunately, this is the "raw" rice before it has been hulled so I'm guessing/hoping the processing after the drying stage (which is done so the rice can be stored 'as is' until time to process it) takes care of getting rid of any dirt and debris added during the drying process!

The first image below is the result of processing the second image below through several steps which will be covered in detail in this tutorial. The original image was shot through the bus window with the iPhone 4s native camera app. Apps used for post processing on the iPad include PerfectPhoto, Touch Retouch, Painteresque, Image Blender, Photo fx Ultra, and A+ Signature.

finished image of rice drying in Cuba
Finished image of rice drying on the road in Cuba.

original, starting image
Original native iPhone 4s image shot through a bus window.

The first steps were done in PerfectPhoto (tutorial available) and included cropping, sharpening and denoise steps resulting in the image below.

cropped image
I chose a square crop to eliminate as many of the distracting elements as possible. You will have noticed that the crop I chose didn't eliminate all of the visor at the front of the bus (still visible along the top of the cropped image) and left some other artifacts and distracting elements due to having been shot through the bus window. I next used Touch Retouch to remove those elements I found distracting. Between the brush and the lasso tool, the entire process took me less than five minutes. If you are new to using this marvelous iPhone app, I recommend viewing the in-app tutorials as many times as necessary to get the hang it it. For those familiar with Photoshop content aware tools, Retouch is the iPhone answer to that function and does a fantastic job of retouching images!

When using Touch Retouch, two finger pinch or spread action will allow you to zoom out or zoom in to facilitate retouching. Sometimes, the entire image won't be visible at first in which case you will want to pinch the image to shrink it to fit in the screen so you can see the edges and work on them. A screen shot below shows the visor marked in red (it was selected using the lasso tool to select a bit of the blue sky all around the edge of the visor). When the right "arrow" (showing as a triangle to the right of the hand icon along the bottom edge of the screen shot below) is clicked after selecting an area for retouching, the retouch tool will magically get rid of the visor and replace it with blue sky.

retouch example
First step in retouching

Additional artifacts were removed with either the brush or the lasso, resulting in the retouched image shown below.

retouched image

Painteresque is just what it sounds like, a painting app that will apply a style of painterly treatment to an image. I had a specific "look" in mind for my finished image and knew that Painteresque would be a good choice. The screen shot below shows the image after Style Painteresque 2 was applied. As you can see, by selecting Style in Painteresque, you get a menu of style options. Experiment to see what is available. It is even possible to Fine Tune any of the styles but I accepted the default settings for the style. It is a bit "over the top" for the effect I wanted, but I knew that blending it with the retouched image in Image Blender would tone done the effect. So I saved it to the camera roll for continued processing.

screen shot of Painteresque treatment applied

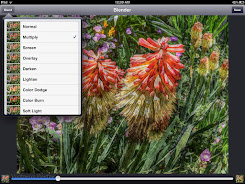
The next screen shot shows the result of loading the retouched image into Blender (tutorial available) on the left side and the Painteresque processed image on the right side and blending using Normal blend with 60% of the Painteresque image in the blend.

painteresque style applied

The last step before signing with A+ Signature (tutorial available) was to take the blended image into Photo fx Ultra and apply a vignette using Lens/Vignette/Black Square at 50% amount and 100% softness as shown in the screen shot below. (The default amount is 100% amount which I find to be overpowering.)

photo fx ultra vignette applied

One step not illustrated is the second iteration of using Touch Retouch to get rid of a strange looking spot in the sky that was exaggerated once the Painteresque style had been applied. The finished image is shown again below because I'm too lazy to code the link needed to go back to the top of the page.

finished image of rice drying in Cuba
Finished image of rice drying on the road in Cuba.

Monday, June 11, 2012

Hydrangea post processing with Painteresque, Moku Hanga and Blender...

This tutorial demonstrates use of Moku Hanga and Painteresque to create a couple of layers (images) that are then blended using Blender to achieve a final result that I found pleasing. It is a very simple tutorial. As always, the steps will be summarized first and then a series of images showing the process will be included below the outline.

  1. The starting point for this tutorial is a cropped and sharpened image (see the PerfectPhoto app guide for steps) obtained from merging HDR images (TrueHDR) shot with the iPhone 4 native camera.
  2. The image was loaded into Painteresque for one "layer" to be used later (Image 1).
  3. The Portrait preset in Moku Hanga was applied to the cropped, sharpened image and the image saved (Image 2).
  4. Image 1 and Image 2 were brought into Blender and blended with Luminosity at 50% and the image was saved.
  5. The saved, blended image was signed with A+ Signature.
  6. Two other images were created for possible future blends, one from AutoPainter Benson effect and one from using "My flower preset" in Moku Hanga. (My flower preset is based on Landscape 2 with the border removed and makes a very nice flower painting.)

cropped and sharpened image
This tutorial starts where the app guide for PerfectPhoto left off, with the cropped and sharpened Hydrangea image.

Painteresque effect
Painteresque effect applied to the cropped, sharpened image.

Moku Hanga screen shot
Several preset effects are available in Moku Hanga. It is worth your time to play around with the presets and discover what works best for your image and the effect you are trying to achieve. For example, the preset I chose for my Hydrangea image is labeled "Portrait" and I just happened to like the effect achieved here. At some point, I might write a mini-tutorial on Moku Hanga but it is pretty straightforward to use. Any image loaded into it will have an effect applied automatically but I never know WHICH effect is applied. Since I like to know what effect is being applied, I always experiment a bit. If you find an effect you like, you can save it out as a Preset with a name that makes sense to you. Use the Share button and select Save Preset instead of Save; presets are organized alphabetically in Moku Hanga so yours will appear according to that organization the next time you open Moku Hanga.

Portrait effect image from Moku Hanga
Saved image after application of the Portrait effect in Moku Hanga.

screen shot of Blender process
Screen shot of Blender showing 50% Luminosity blend of the Moku Hanga Portrait image with the Painteresque image.

signed image
Signed image (signed with A+ Signature; usage covered elsewhere after blending as described above.)

These last three images are included to show a screen shot after using "My flower preset" in Moku Hanga, the saved image after applying that preset, and last, AutoPainter 3 Monet effect applied to the cropped, sharpened image. I often save multiple versions of an image for later experimentation, even after I've found one combination I like well enough to sign it.

my flower preset in Moku Hanga
The preset I've saved in Moku Hanga as "My flower preset" is based on the supplied Landscape 2 preset with the border removed.

Moku Hanga saved with my flower preset effect applied
Image saved from Moku Hanga after applying "My flower preset."

AutoPainter 3 Monet effect applied to image
AutoPainter 3 Monet effect.

Monday, May 21, 2012

How to blend two "blah" images into something nicer...

trueHDR image 1trueHDR image 2
While stopping by a friend's garden, I noticed these Red Hot Poker flowers and decided to see what I could do with creating an image using them. Notice that the left image (referred to as Image 1) has nothing interesting on the far right and that the right image (Image 2) has a very boring background. However, I could visualize possibilities for a very nice image by combining elements of the two images into a single image. This tutorial will explain the process that I used to reach the following two possible end results. (As always, experienced iPhone photographers will probably find the detailed steps tedious but those of you new to iPhone photography and post processing might just learn a thing or two. At least that is what I hope!) Linking to Weekly Top Shots.

Steps in brief for the experts among you...
  1. Images 1 and 2 were obtained by merging two images (shot with iPhone 4 native camera in HDR mode) in TrueHDR.
  2. PerfectPhoto was used on Image 1 to Sharpen, Denoise and save the image.
  3. PhotoForge was used to crop Image 2 and slightly rotate it so flower stems aligned with those in Image 1.
  4. BlurFX was used to slightly blur Image 2 since it will be in the background in the final images.
  5. Blender was used with masking and arranging to position Image 2 behind Image 1 and paint away the right side Image 1 to reveal parts of Image 2 that I wanted in the final blended image; blend at 100% to completely hide Image 1.
  6. Retouch was used to remove parts of the image I found distracting.
  7. Three painting apps were used on the blended image to achieve 3 different looks for further blending.
    • Moku Hanga (later referred to as Moku image)
    • Painteresque (later referred to as Painteresque image)
    • AutoPainter Benson (later referred to as AutoPainter image)
  8. The Painteresque image was blended at 20% Multiply (screen shot) with the Moku image.
  9. The Painteresque image was also blended at 50% Normal with the AutoPainter image
  10. Both end result images were signed with A+ Signature.

Moku Hanga blend with painteresque
painteresque autopainter benson blend
The top image is one option for final processing; the bottom image is a second (and preferred by me) option for the final image. Both processing paths will be explained in the following steps.

sharpen and denoise image 1 in PerfectPhoto
crop and slight rotation of image 2 in PhotoForge
Image 2 has the Red Hot Poker flowers growing upright whereas Image 1 (shown as the first image above after the Sharpen and Denoise steps in PerfectPhoto had been performed) has them tilted (that's how they were growing in the garden). Because I wanted to use image 2 in the background of image 1 when I blended the images, I used the PhotoForge (not PhotoForge2) Crop Tool to crop and slightly rotate Image 2 using the 1° incremental arrows until the flower stems were angled similarly to those in Image 1 as shown in the PhotoForge screen shot above.

cropped, rotated image 2blurred image 2
The cropped and rotated Image 2 (left image) was loaded into BlurFX and a slight bit of Gaussian Blur was applied to achieve the desired degree of 'out of focus' look for blending with Image 1. Hint about using BlurFX: Use the New button to load in an image; then select (if it isn't already selected) the Gaussian Blur effect and use the Threshold slider to tone down the blurriness (right image) until you are happy with the result.

final blended image
final blended image after retouch

Complete instructions for using Blender to blend and mask these two images to get the top image as the final result are on a separate page in the interest of keeping these instructions somewhat brief! The bottom image is after retouching (Retouch app) out some elements of the blended image that I found distracting.

Now for the fun part. Shown below are the results of using three different painting apps to achieve artistic effects that will be combined (again using Blender) to achieve two different looks for the blended image.
moku hanga treatment
The image above shows a Moku HD (Moku Hanga on the iPad) painting effect applied to the blended image. This app seems to randomize the Style that is applied when you load an image into it. If you find a look you like by experimenting with the Styles and controls, you can save it as a Preset using the Share button and it will show up in Styles the next time you open Moku HD. It is possible to tune each Style by using the Adjust (to adjust brush effects), Paper and Border settings on the Style. I've found I like the Landscape Style with the border removed for MOST of the images I process (including this one) and have saved that as a preset.
painteresque treatment
The image above shows Painteresque processing of the blended image. Painteresque is very simple. There are no options for changing the effect on your image and no settings options. You either like what it does or you don't. I find it very interesting but somewhat overdone so almost always blend a Painteresque version of an image with another version of the same image to tone it down.
autopainter benson treatment
The image above shows application of the AutoPainter Benson effect to the blended image. I have the original AutoPainter app which has four effects. I've experimented A LOT with it and almost always come back to the Benson effect and apply that to my images before blending with another version of the same image.

screen shot of Blender processimage result of blend
On the left is a screen shot of Blender showing conditions of blending Painteresque image (loaded on the left in Blender) with the Moku HD image (loaded on the right in Blender); on the right is the saved output from this blend which was signed in A+ Signature to yield the result shown in the top one of the two images shown elsewhere.


screen shot of autopainter benson blend with painteresqueimage result of blend
On the left is a screen shot of Blender showing conditions of blending the Painteresque image (loaded on the left in Blender) with the AutoPainter Benson image (loaded on the right in Blender); on the right is the saved output from this blend which was signed in A+ Signature to yield the result shown in the bottom one of the two images shown elsewhere.